
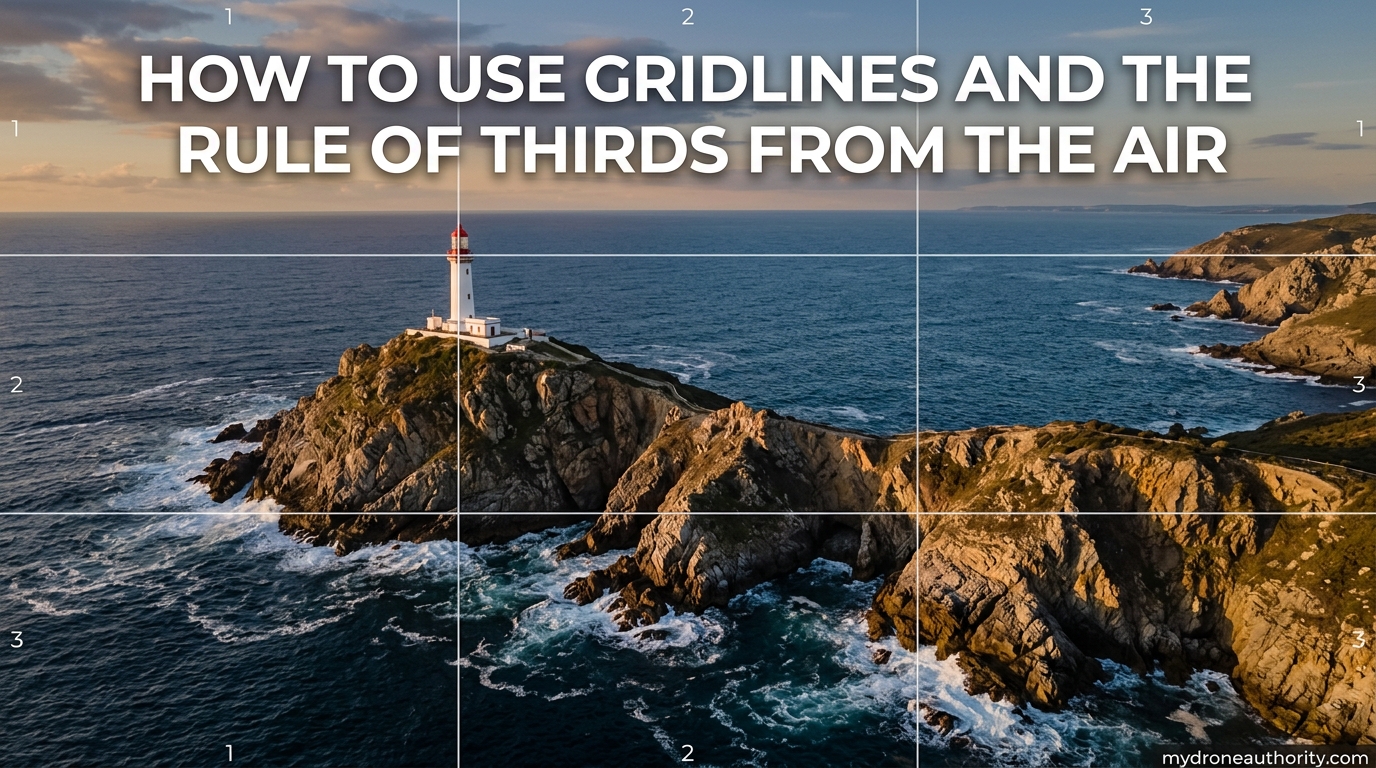
Framing a shot from 200 feet above the ground changes everything you thought you knew about composition. Trees become texture, rivers become leading lines, and a single building can anchor an entire scene. That is exactly why learning how to use gridlines and the rule of thirds from the air is one of the fastest ways to transform your drone photos from flat overhead snapshots into images people actually stop scrolling to look at.
When I bought my first drone, I assumed great aerial photos came from flying high and pointing the camera down. After 400 flights and thousands of deleted files, I learned the opposite is true. The best aerial shots come from disciplined composition, and gridlines are the single tool that makes that discipline possible.
This guide walks through what the rule of thirds actually is, why it matters more when you are flying, how to switch on gridlines in your drone app, and the step-by-step process I use to frame shots while balancing flight controls. Whether you shoot with a DJI Mini, an Air series, or any camera drone with an overlay option, the same principles apply.
Table of Contents
What Is the Rule of Thirds?
The rule of thirds is a composition guideline that divides your frame into nine equal parts using two equally spaced horizontal lines and two equally spaced vertical lines, creating a 3×3 grid. The four points where these lines cross are called intersection points, power points, or sweet spots, and placing your main subject near one of them tends to create a more balanced and visually interesting image than parking it dead center.
Think of the grid as a targeting system for your eye. Instead of asking “where does the subject go,” the grid gives you four clear answers and encourages you to choose one intentionally. The lines themselves are just as useful as the intersections, because aligning a horizon line, a road, or a coastline with one of the horizontal lines keeps the image from feeling top-heavy or bottom-heavy.
Photographers and designers have leaned on this guideline for over 200 years because it reliably creates visual weight without feeling forced. It is not a law, but it is the strongest default you can build from, especially when you are composing at altitude where the ground below can look chaotic and flat.
Why Gridlines Matter More When You Fly
On the ground, you can walk closer, crouch lower, or tilt your camera to fix a weak composition. In the air, every adjustment costs battery time, wind correction, and mental bandwidth. Gridlines give you a near-instant reference for where subjects sit in the frame, which means fewer test shots and more keepers per flight.
Aerial photography composition also deals with a problem ground photographers rarely face: the top-down or near-top-down angle flattens everything into a two-dimensional pattern. Without the depth cues we are used to, the eye needs structure to know where to look. The 3×3 grid provides that structure by carving the frame into zones you can place subjects in deliberately.
Sunlight is another factor. Most drone controllers are hard to read in bright outdoor conditions, which makes subtle framing errors easy to miss until you review photos at home. A bold grid overlay is visible even on a washed-out screen, so you can confirm horizon placement and subject alignment before you fly home.
How to Enable Gridlines on Your Drone Controller
Most modern drones ship with a gridline option buried in the camera settings of their companion app. The exact menu path varies, but the process is similar across the major platforms.
For DJI Fly app (Mini series, Air series, Mavic 3): Open the camera view, tap the three dots in the upper right corner to open Settings, tap the camera icon tab, then toggle on “Grid” or “Gridlines.” The 3×3 overlay will appear on your live feed immediately.
For DJI GO 4 (older Mavic, Phantom, Spark): Tap the gear icon under the shutter button, select the camera tab, and switch “Grid” to on. The same grid pattern appears over your live video feed.
For Autel, Skydio, and other apps: Look under Camera Settings, Display, or Composition for an option labeled Grid, Gridlines, Rule of Thirds, or Composition Guide. If your app does not offer one, you can apply a grid during post-processing in Lightroom, Snapseed, or Photoshop.
Once the grid is on, leave it on. Every photo you take will have the overlay baked into your review process, which trains your eye to compose in thirds even when you are not looking at the screen.
How to Use Gridlines and the Rule of Thirds From the Air: Step by Step
This is the exact process I use on every aerial shoot, from real estate flyovers to landscape work over coastline and farmland.
Step 1: Plan your shot before takeoff. Open your drone app on the ground, enable gridlines if you have not already, and look at a satellite view of your location. Decide which subject you want to highlight, whether that is a house, a rock formation, a boat, or a stretch of road. Having a plan keeps you from wasting flight time circling aimlessly.
Step 2: Fly to a rough position first. Get the drone into the air and move it to the general area where you expect the shot to live. Resist the urge to fine-tune composition while you are still climbing or traveling horizontally, because wind gusts and altitude changes will throw off your framing anyway.
Step 3: Hover and let the drone stabilize. Once you are in the ballpark, stop moving the sticks for two to three seconds. Most camera drones have a three-axis gimbal that needs a moment to settle, and your gridline placement will be far more accurate once the frame is steady.
Step 4: Identify your main subject on the grid. Look at the live feed and find the subject on the 3×3 grid. Note which of the four intersection points it is closest to. If the subject is centered, that is fine for now, you will reposition in the next step.
Step 5: Nudge the drone so the subject lands on an intersection point. Use small, gentle stick movements to shift the drone left, right, forward, or back until your subject sits on or near one of the sweet spots. Avoid using gimbal tilt alone to fix framing, because tilting changes the perspective and can distort buildings or horizons.
Step 6: Align the horizon with a horizontal gridline. If your shot includes a visible horizon, place it on the upper or lower horizontal line instead of the middle of the frame. Land in the lower third to emphasize sky, or land in the upper third to emphasize the ground below.
Step 7: Check your battery and take the shot. Glance at battery percentage before you commit to a burst of photos. Once you are happy with the composition, take two or three shots at slightly different exposures so you have options in post.
Step 8: Review and adjust. Swipe to gallery view while the drone is still hovering. If the composition looks off, you can nudge the drone and retake the shot in seconds. This is the single biggest advantage of drone gridlines, you can fix framing in the field instead of wishing you had another flight.
Aerial Composition Techniques That Actually Work
Once you have the grid on and the basics down, a few composition techniques translate especially well to aerial photography.
Leading lines from above. Roads, rivers, fence lines, and trails read completely differently from the air. From above, they become graphic lines that pull the eye through the frame. Place the start of a leading line in the lower third of the grid and let it travel toward an intersection point in the upper third for a natural sense of movement.
Foreground and background layers. Even from above, you can create depth by including something close to the drone and something farther away. A tree branch in the lower third combined with a valley or coastline in the upper third gives the image a foreground-background relationship that flat top-down shots lack.
Negative space from altitude. Sky, water, sand, and snow all act as clean negative space when shot from above. Placing your subject on a sweet spot while letting two-thirds of the frame breathe with empty texture creates a minimalist look that works well for real estate, travel, and fine art aerial photography.
Diagonal alignment. The rule of thirds pairs well with diagonals. If you have a coastline or a mountain ridge running across the frame, align it from one corner area to the opposite intersection point. This creates dynamic tension without breaking the grid.
Subject scale tricks. A single boat, car, or person placed on an intersection point instantly communicates the scale of the landscape around it. Without that anchor, wide aerial scenes can feel like abstract wallpaper.
Common Mistakes to Avoid
Centering every subject. It is the easiest habit to fall into, especially when you are focused on flying. Centered subjects work for symmetry, but they kill visual interest in most aerial scenes. Use the grid to break the habit.
Forgetting to fly first, then compose. Trying to fine-tune framing while the drone is still moving leads to blurry photos and wasted battery. Get into position, hover, stabilize, then compose.
Ignoring battery while framing. It is easy to lose ten minutes chasing the perfect intersection alignment. Check your battery before you start fine-tuning and set a hard return-to-home percentage.
Relying only on gimbal tilt. Tilting the camera to move a subject onto a gridline distorts vertical lines in buildings and shifts your horizon. Move the drone itself whenever possible.
Shooting JPEG only. RAW files give you far more room to crop and re-compose in post without losing quality. If your drone supports RAW, turn it on, especially while you are still building composition muscle memory.
When to Break the Rule of Thirds
The rule of thirds is a guideline, not a law. Once you understand why it works, you can choose to ignore it for specific shots.
Symmetry is the most common reason to break the rule. A perfectly centered reflection in a calm lake, a circular crop pattern shot directly overhead, or a symmetrical architectural layout all look stronger centered than offset. The visual balance comes from the symmetry itself.
Strong leading lines that converge on a central subject also justify breaking the grid. If every road, river, or shadow in the frame points to the center, fight the urge to move the subject off-axis.
The key is to break the rule intentionally. If you cannot explain why a centered composition works better than a rule-of-thirds composition, default back to the grid.
FAQs
How do you use the rule of thirds grid?
Switch on the gridlines in your camera or drone app, then position your main subject on or near one of the four intersection points where the horizontal and vertical lines cross. Place horizons along the top or bottom horizontal line instead of the center of the frame.
How can I practice using the rule of thirds?
Leave gridlines on permanently and compose every shot through the grid, even casual phone photos. Review your images with the grid overlay still visible in your editing app and compare centered versus off-center framing on the same scene.
How to use gridlines in photography?
Enable the grid overlay in your camera viewfinder or drone app menu, use the lines to place horizons, and use the four intersection points as targets for your subject. Keep the grid on for every shot so your eye learns to compose in thirds automatically.
What is the three-grid rule?
The three-grid rule, better known as the rule of thirds, divides an image into nine equal sections using two horizontal and two vertical lines. Subjects placed on the intersections of those lines tend to create stronger, more balanced compositions.
Conclusion
Learning how to use gridlines and the rule of thirds from the air is the single highest-leverage skill you can build as a drone photographer. The grid gives you an instant targeting system for intersection points, a reference for horizon placement, and a discipline that saves battery and sharpens your eye on every flight.
Start by enabling gridlines in your drone app today, leave them on permanently, and run through the eight-step process on your next flight. After a few sessions, composing in thirds becomes muscle memory, and your aerial photos will start to look less like overhead snapshots and more like intentional, balanced images.